20200303 - Progress :
- very rough merge of Gael's updates and subpanels - lots is noworky
-
"process" of release myrobotlab.jar and InMoov2.zip is very quick - big improvement,
but running InMoov2Gui.js & InMoov2Gui.html in debug mode with mrl in eclipse needs work.
Latest PR has "peer" button, that searches for peers
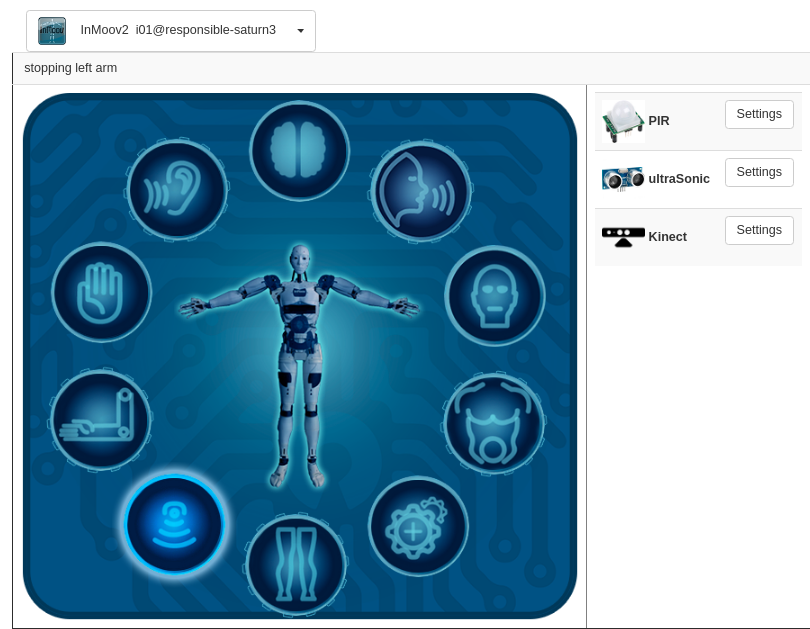
Gael supplied some great graphics for the new UI. I have been working to get the variouis "sub-panels" working for each of the buttons. I'm waiting or Gael to send some html so I can have the buttons high-lighted when activated. In the interim I'm using the bottom buttons to mock the click events.
.png)
Hello Grog, Having a
Hello Grog,
Having a graphical GUI for introduction to MyRobotLab would be really great.
Last night I designed a UI for the InMoov front webgui, making simple and clear icons.
Each icon could direct to a sub class with more UI accessories.
It would be great if the webgui can integrate the buttons where I designed the icons.
Perfect ! ... it would be
Perfect ! ... it would be great if we're a team on this.
I can start a mock-up with the one you supplied here, I think perhaps it might be useful to additionally have the buttons saved seperately, as a quick indicator in the sub-menu. Can you send them as pngs too ?
WOOHOO - excited :)
Do you have PRESSED vs NOT
Do you have PRESSED vs NOT PRESSED versions ?
I think it looks great ! ...
I think it looks great ! ... it takes some real estate, so square dimensions might work better.
You select a button and the highlighted section changes on the right depending on context.
I need to know what the different parts you were thinking of ..
top brain then,
mouth,
head,
torso,
settings / configuration ?
legs - uh is there code for this ? :)
Pir ?
arms,
hands,
ear
There are several different
There are several different ways to make images activate like buttons in javascript/css/html.
I would prefer the 3rd choice, its simple, clear to see what is going on, less prone to alignment issues, and is lower maintenance and more portable.
This means you need to slice up image into a grid similar to this. One set of non-active buttons and one set of activated buttons. The cut lines must be horizontal or vertical, and you don't want the buttons to overlap the lines.
Hit Boxes
Quite a while back I used a system that displayed a whole single graphic in a window (e.g. 1000,1000)
Each Icon x,y position was located in a lookup table (eg. icon 1 @ 100,80 , icon 2 @ 500,323)
On mouse press over the window (aka button screen graphic)...its x,y coord is noted and then walked through the table using a kind of bounding box approach.....
i.e. if mouse was 90,88 ... lookup would check it to see if it was between 90 +10 and 90 -10 & 88 +10 and 88 -10 etc... (bounding box of +/- 10 around the cursor position.)
In my case I was lazy and replaced the whole graphic with its button pressed equivalent (yes the whole screen , not exactly efficient however it worked).
html map The lookup table
html map
The lookup table your describing sounds similar to html image maps
https://www.w3schools.com/html/html_images_imagemap.asp
Its become legacy, I believe because of the challenges and lack of embedded tools to manage or maintain the tables and coordinates.
css absolute background-image magic
https://tympanus.net/codrops/2013/11/07/css-overlay-techniques/
This is a more modern technique(s), but still can be a challenge because of individual pieces, classes, or ids being mapped with a coordinate system.
slice dat image !!!
Slicing images into components makes programming substantially easier. There is no hidden layer, no coordinates (absolute, or relative) to manage. The sliced piece of image "is" the button. No guessing, tweaking, or frustrating aligning... goodtimes !
Hello Grog, That sounds
Hello Grog,
That sounds really cool!
I will prepare the buttons seperately with a highlighted and non highlighted.
Hopefully I can prepare them tonight, tomorrow I am living for a sort of Makerfaire in Bretagne.
Sébastien certainly could help us a lot on this because he already had been working an a html version a while back as you know.
I think what we need in sub UI are all the configs we currently set in the config files of InMoov.
Each of these files contains the current necessary configurations.
I will design some sub UI looking like this for the servo mappings and servo configuration of each skeleton part:
I'm using some buttons at the
I'm using some buttons at the bottom, in order for me to work on programming, but when the highlights come and when the image is segmented, I'll remove the bottom white buttons.
If this is the "Settings" icon I envision a list of "sets" of configuration. Each one of these will be a folder in the
data/InMoov2/config directory.
InMoov2 will come with a "default" set of configuration, but at any time a user can save a new set with a different name.
The configuration files will be python. They will be clean, small, and documented with comments.
The files will be ordered in (mostly) how they were started .. this depends on how we choose to group them.
The above could be an example.
Configuration is and will be one of the more difficult things to manage. So, we would benefit in having some structure. Potentially, the structure can provide the user to save many configuration "sets" at any time through their experimentation, and the user would be able to re-load this config and expect the same state that they left off.
MRL needs some general rules on how to export config and how to load it. This starts by defining some general rules. For example :
I'll need to think/experiment a little more to show what that might mean
The icon with the gears and +
The icon with the gears and + is for all the extra things that need to be configured, like the Neopixel, the kinect, and stuff to come in the future.
I think we need to configure each part in a seperate Ui which relates to a specified config file.
For example we could configure each servo for the arms and set them as activated via a UI like this:
More on configuration
It would be handy if how the servos are connected could be more easily configured as well.
They my be connected to PCA9685 instead of an Arduino Mega 2560, and in some setups there may not even be an Arduino installed at all....
Running a Raspberry Pi with the I2C bus to 1 or more of the PCA9685.
Just a thought having not long ago seen someone else looking at a similar setup in the forums...
Hi Ray, Great to see your
Hi Ray,
Great to see your input.
Absolutely. I know this is of interest to many people ... including myself. Its more complex than the general "switching on/off" services and will take more work to do it satisfactorily.
On a very high level I suspect it will be a series of dialogs that defines a process to create your servo controllers. This would probably start showing a list of possible servo controllers available (running or waiting to be created). The user would select the desired one and continue the dialogs to associate and configure the servo controller they desired.
In the end - there should be a "save" button which saves all this to one of the settings/configurations, so the process would not need to be done again. Instead it could be quickly loaded the next time on startup.
Hello Grog, I Keep lurking
Hello Grog,
I Keep lurking around, more than you know :-)
MRL is one of my startup pages in Chrome :-)
Ithink I had mentioned the controller support in Inmoov2once before,butas they say, the squeeky hing get the oil :-)
Awesome!
This is beautiful!
The picture slicing worked
The picture slicing worked great ! ... I think this will be very good way to go.
I suspect the output of this process also generated an html file. If you happen to find it, could you send it too?
Otherwise its a jigsaw puzzle for me.
Awesome! It's looking very
Awesome!
It's looking very good. I don't know if it's too much to ask, but maybe thinking ahead can be easier later.
Could it be done so that you can change the skin like winamp?
is that possible?
Thinking that you can modify the buttons, colors, background and styles, changing the PNG of a folder and you could choose different skin that suits the style of your robot, dark, light, scary, minimalist, etc.
Then using the same filename of the buttons, you would only need to modify the PNG in another folder
skins/dark
skins/light
skins/scary
skins/minimalist
skins/drunk
skins/evil
skins/ironman
It's just an idea.
Changing the css/color would
Changing the css/color would be pretty easy, changing any graphics/pngs would be out of scope for us, but that doesn't mean anyone could substitute their own pictures.
The location of the pictures would be in the mrl directory/resource/InMoov2/*.png
Excelent!
Sorry if my English was not well understood. I did not pretend for you to change any graphics/pngs, I only thought of an option so that you can select the folder where the PNGs are located. But for me it is enough with what you explained.
If you or Gael need help with the graphics, let me know. I would love to help you guys.
Cracked !
Cracked !
Hello friends. Maybe this
Hello friends.
Maybe this can be helpful.
http://polibol.com.ar/myrobotlab/index.htm
source
Nice, this seems to work
Nice, this seems to work better than the slicing I have done for Greg.
Did you use a special app to do it?
Hi Gael I only used
Hi Gael
I only used photoshop to crop the buttons of a capture of your design and make the individual effects of the 3 states.
Then I found the code to distribute in a circular way:
http://jsfiddle.net/ThiefMaster/LPh33/4/
No special soft, just html, javascript and css for the style.
You can change the number of buttons in the field above and they are rearranged. I have to do some cleaning in the code, I did it quickly to see if it was useful for you.
Cool Astro ! Do you mind if I
Cool Astro !
Do you mind if I take your pieces ?
Interesting idea on the dialog/shadow box.
It does save screen real estate, but it took me a little bit to figure out, so I think we will switch dialogs to the right of the menu selector.
Thanks for jumping into this ;)
Hello Grog. In reality, is
Hello Grog.
In reality, is not saving anything, it's only one page, the code never makes a submit, I left the code to you, use whatever you want. I have a finished version but I don't have access to my work's server again until Wednesday (Carnival holiday here). I have a rar file but I don't see an option to attach a file here.
This is my dynamic ip. So
This is my dynamic ip. So these links will work for now.
Here you can see the latest version with style improvements,
http://181.170.68.84/myrobotlab/
All the fields would have to be processed in a FORM with just one SUBMIT
But if you have already solved it in another way, and you would like to use it only as an interface of buttons if I understood correctly, here you have a simple version with only the buttons and you can add the action on line 140
http://181.170.68.84/myrobotlab/only_buttons.htm
Files:
http://181.170.68.84/myrobotlab/ui_v3.rar
:)
Thanks Astro, The pictures
Thanks Astro,
The pictures are great - thanks for making them in 3 states.
I'm making progress making it all work in the webgui.
I was curious if you have used the new webgui on the develop branch ?
My plan is after I get the main menu working satisfactorily, I'll go back and see how you designed your sub-menus. You're web design skillz are very honorable.
Just a little background if your interested. The webgui is coded currently in AngularJS (at some point we'll switch to React but not before the Nixie release).
The webgui sends messages over websockets to update data, form posts are not used.
I have limited time but would welcome any input you might afford us.
Cheers
I never used webgui. I'm
I never used webgui. I'm still with the Manticore version.
I don't know how to use the develop version, I didn't have time to investigate how it is compiled and all that. I am waiting for the Nixie version to see if the framegrabber part works, because I am using the camera on the nose of the Terminator that is on a raspberry streaming with UV4L. So for now he is sleeping.
I'm just being guided by the images you post here about how webgui looks.
I will try to follow some tutorial to see how to open the develop version.
About the menu, I cleaned the code a bit and updated the first version if you are interested in seeing how the design structure is, you can see it in my first post. And download the updated .rar again. It's basic HTML and CSS.
I'm going to do some research on Angular and websockets, maybe I can help with something.
I can't see this picture:
Don't worry about the
Don't worry about the picture, not a big deal.
The latest "checked in" develop myrobotlab.jar should be downloadable here.
But the latest I still need to push the changes i'm working on locally.
My next steps are :
I'm certainly interested in any input you might have.
The working buttons are
The working buttons are spiraling into position.
Need to do another local transform rotate and center their rotation around a single point :)
closer ... I'll finish it
closer ... I'll finish it up tomorrow ... getting late here now ..
After that I have servo palsy to take care of ... and after that I'll start looking into config.
Hello Grog, Astro,I just
Hello Grog, Astro,
I just installed the latest from the developp but unfortunately all img are missing in the resource/InMoov2/
I tried to access the InMoov2 developp branch on Github, but it seems the directory is locked.
Well, at least I can't access it, I am sure you have access.
I wanted to see how the files were configured in order to make them clean under Photoshop, because I suspect, they must be a bit damaged after being cut off from my original image.
By the way I have pulled some requests on Github for the InMoov2, can you accept them and push them in the next developp release?
Here is a tree to explain how I envision the sub menus for the InMoov2 webgui.
For the hands, Arms, Head,Torso, Legs I will create new img which will guide to the sub ui functions:
Any suggestions is helpful...
Looks pretty awesome
Looks pretty awesome Gael.
Pretty cool for mouth, as an example, I already have what you have working ...
I'll have to check on the others ..
Your "extras" I assumed were "settings" ... but we need something to manage CONFIG
This will be pretty important - I want something for which I can tweak all these things and configuration is saved. I shutdown everything ... start up the InMoov2 service and load a config and all the config will be loaded, and it will be worky as I expect it. You have Extra -> NeoPixel, if you want that to stay we need another config button on the front.
I don't uderstand the arm sub-gui - are they all sliders? how do you want to set min/max ?
thanks for posting ...
I think the robot in the
I think the robot in the middle should become the button for settings. It should be a select a config or load a config option.
And then each subdirectory will have a save config button:
This is what i see
This is what i see locally.
I'll have the robot button working soon - and inmoov will be "selected" by default so it should be high-lighted with the setting panel there...
Anything else you can think of ? All the submenus don't have all the functionality yet .. but i'm getting that done piece by piece .. its going pretty well so far..
I am working on the submenus
I am working on the submenus as well to figure what is best for a beginner to get through it easily.
on the settings menu:
-We should be able select a config or create a new one and load., but I think the save button should be only in the other submenus
-Seems to me the "disable" button should also have an "AutoDisable all"
-Once the gesture are loaded, it would be nice if there is a arrow to show there is a drop down that is now available
For the arms I think
For the arms I think something like this could be nice:
Hello Gael, Grog! Now I
Hello Gael, Grog!
Now I understand better what this was all about.
I didn't understand if those rectangles were going to be buttons or boxes with values.
Now I understand, the left part is going to be just a graphical interface alway with navigation buttons.
That being the case, it is not good for the buttons to move or change places.
"Back to Main"
For usability in a navigation interface, it is better that the buttons are always in the same place, for visual and muscular memory.
For example if on the right side the content is more abundant in one section than in another, the "Back to Main" button is going to move, will be much lower and perhaps hidden having to find it with the scroll.
What if that "Back to Main" button that is also part of the navigation is like an arrow in the graphic interface? Something like a small arrow or Home icon in the bottom left?
That way all the navigation would be in the graphical interface and the configuration on the right.
I was thinking that the robot part could serve as a monitor at a glance which parts are active.
For example, the deactivated arm could be somewhat transparent if it's not active and the activated parts highlighted.
Perhaps it could also serve to indicate problems in red.
I don't want to interfere with your design, I'm just throwing some ideas.
You are doing a great job to make everything more intuitive for users.
Very interesting ideas
Very interesting ideas Astro.
I agree on the back button - I as a noobie could not find it when it was on a sub panel because I wasnt looking for it there.
I quite like the idea of red-error yellow-warning .. its pretty novel, and it looks cool although textually it doesnt provide much info. Kind of a nice indicator to see whats active, error, etc. The positioning will initially be a pain.
It was a pain to get all the buttons in a circle. However, after the initial cost, its now trivial to add more buttons.
I want to make sure this is understood - because adding or subtracting main menu buttons now is easy .. for example
I added 3 more (extra) buttons quickly. they are functional with the minimal amount of effort. They auto place themselves.
The same will go for the center inmoov button(s). The initial segementation of the parts will be a pain, but once its done - adding layers or different colors is as easy as just providing the images.
I'd be fine with it if someone wants to make all the images of it and have them correctly positioned with "absolute css" relative to the center of the background.
I can make the parts in
I can make the parts in different colors with the absolute position if you want. But I don't have the inMoov with a transparent background, I just roughly cut the figure from Gael's image to make the example. If that helps you and Gael to save time, I can do it. I just need the inMoov.
Thinking about usability:
It would be good to add the "alt" attribute on the buttons in case the images do not load as it happened to Gael. For example alt = "Brain"
Maybe it can be somewhat confusing if the robot is a button and at the same time an indicator, because the other settings have their circular button and the user can feel lost trying to find where the "Main Settings" button is.
One option could be to move "Main settings" to another circular button since Grog can easily add it.
The other option is leave that "Main settings" button in the robot and this whole idea of errors indicators can be on another screen maybe in the future where the errors are detailed.
But I am also thinking that I have not seen errors in one hand, or in the torso for example. The errors that I have seen, are usually related to the arduino, error in framegrabber, in a phyton script or things like that, but I not saw errors yet that is specifically from some physical part such as a hand, arm or torso that I remember.
Perhaps in the future this may indicate that a value is dangerous for physical collision.
For users who do not have English as their native language, it can be confusing and take a long time to translate, decipher and know where to look at errors.
This is how I sometimes see the screen with errors.
In this example of usability, the battery icon is essential to understand the problem among all that confusing and cryptic data.
That's why I thought the most useful thing would be to show the active parts. Seems important to me, since they are disabled by default. That was my first problem when I started using MyRobotLab, it took me a long time, days, weeks frustrated not knowing what was going on, until Grog told me that I should activate each part in the configuration.
I can make the parts in
I can make the parts in different colors with the absolute position if you want. But I don't have the inMoov with a transparent background, I just roughly cut the figure from Gael's image to make the example. If that helps you and Gael to save time, I can do it. I just need the inMoov.
For Gael and you : Images should have transparency additionally (and almost more importantly) -
IMAGES SHOULD BE CROPPED AS CLOSELY AS POSSIBLE
This is for functionality, because to make them functional I am using the image as a button, and if the button has a huge transparent then it is a huge button, hiding other buttons with its clickable transparency
I hope this makes sense.
We should have a large bucket of InMoov images with transparencies that are cropped as close as possible to the non-transparent image. After this is done, absolute positioning can be done safely.
If that is done I can incorporate these images into functional parts of mrl smoothly.
It would be good to add the "alt" attribute on the buttons in case the images do not load as it happened to Gael. For example alt = "Brain"
I thought about this too, but in the end decided against it. Gael only experienced this because I am busy trying to make the continuous integration/continuous development (ci/cd) of InMoov2 separate from myrobotlab.jar build. If I can do that, we have ~10 second build and distribute times ... and this very low time is good for code jams. Code Jams of trying different things out quickly and getting good feedback.
Once I get 10s ci/cd working for InMoov2, the alt thing just becomes more text and clutter.
lost trying to find where the "Main Settings" button is.
The main settings/configuration button and InMoov button in the center will be the default one selected. So, it will be what the noobie see's first - hightlighted. Again, once I get 10s ci/cd worky - you can see it. Describing graphics in text is difficult.
One option could be to move "Main settings" to another circular button since Grog can easily add it.
I think this is a rather good idea - it would be consistent then with all circular buttons doing "control" and the inmoov center image being "status" ... I do love control being seperate from status !
Nice point with the video and description. I agree. And it makes me agree more that the center image should be status and a circular "settings" button be created.
Great input Astro .. soon I'll have InMoov2 ci/cd on and we all should be able to quickly see change --and--> effect.
@Gael - I see what you mean
@Gael - I see what you mean ..
I need to think about how to effeciently, and generically surface parts of peers
@Astro,Thanks for the
@Astro,
Thanks for the ideas.
I agree with you the "back to main" should be on the graphical environment. and using a symbol icon will be better than words.
I really like your suggestion regarding the parts of the robot that would be active or with error.
it makes the graphical more useful, even though as Grog pointed, it is more for the pleasure of the eyes than a real technical benefit.
Because those errors img (robot parts red/orange) wouldn't be buttons but only messages, I'm guessing it's okay if they overlap each other?
The robot is already the main settings button, should it be an img that is overlaping all the errors img?
Maybe to indicate a part is activated instead of the robot it could be done on the round buttons, we can use gif instead of png, maybe it could be cool to add a small light effect that travels around the circle.
@Grog, if we have the option to use generic components of webgui services in other displays, it would be very handy. Last night I really tried to make the language list and microphone work, but now that you answered my quest, I understand better why I had difficulties getting it properly worky.
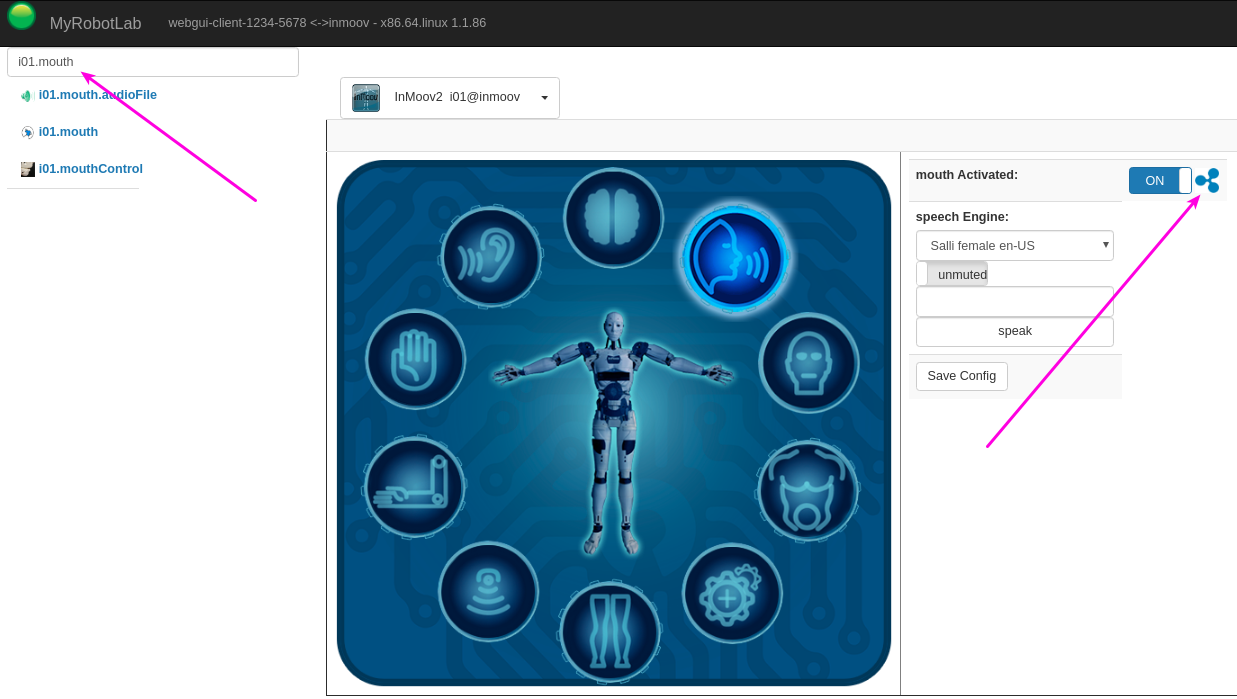
Trying to explain the
Trying to explain the functionality of this little green"+" button that I have added.
Step1- Activate the head by clicking the "OFF" button, it turns to "ON" blue state.
Step2-The green "+" appears
Step3- Clicking the green "+"
step4- It automaticaly sets the left panel to select only services related to head
Result:
We can imagine doing this for all the services available in the InMoov menus.
This would really help beginners to understand what is the functionality of all the services in the left panel.
Ya .. sounds good Gael. At
Ya .. sounds good Gael.
At the moment I'm working on infrastructure to create fast updates for inmoov..
I've just added the feature that InMoov2 now has the "latest" InMoov2.zip as a dependency.
So whenever anything in the InMoov2 repo changes and it gets built 7 seconds later .. you can on your machine do this :
java -jar myrobotlab.jar --install InMoov2
and the update will install
I think it would be really cool if InMoov2Gui.js & InMoov2Gui.html was part of that package - so that all changes to these files could benefit from the speed of delivery ... its possible but will take more work
@Gael - I think the peer
@Gael - I think the peer filtering was an excellet idea ...
I think also the peer "button" is not needed, just clicking on one of the circular buttons should be enough. When I click on the head button, the i01.head should filter - clicking on the center status could return all services to show on the left.
Hello, @Grog, thanks for
Hello,
@Grog, thanks for doing the peer filtering, it will be very handy for other search buttons as well!
I think there is more to it, for exemple in the head, we have vision, having a peer button to get the left panel showing only what is related to opencv will be also very usefull.
I did a PR last night, and your PR must have crossed each other. I have worked on many sub panels for configurations, like neopixel, ultrasonic, kinect and more.
The goal was to set up the organisation of the sub panels.
I agree that the middle robot button shouldn't be for to do the settings, but more for to start playing with the inMoov virtual, gestures...
@Astro, I have already done the robot on blank background, which you can use for to do the seperation of each body part. It's located in https://github.com/MyRobotLab/InMoov2/tree/master/resource/InMoov2/img
I have made 4 states per buttons _off, _on, _hover, _Activ.
The Active state can be used instead of "_on" , because it is more visual.
These are some of the sub panels I have been working on, cliking on settings button, opens a new panel with the necessary settings to match the current python files to run START_INMOOV.bat
I did a PR last night, and
I did a PR last night, and your PR must have crossed each other. I have worked on many sub panels for configurations, like neopixel, ultrasonic, kinect and more.
Hi Gael,
your prs are still there - but I will have to come back and incorporate them. I had to do many changes to get things to work - and now my priority is to make the - change/update/build/deploy/download/upgrade process as short as possible. I've now moved over the InMoov2Gui.js & InMoov2Gui.html to the InMoov2 repo (and the jmonkey VinMoov5.j3o asset.
I'm pretty close - just need to finish the last details.
Your screen shots of the subpanels you made are very useful - thanks for that..
I'll get them incorporated in right after I have the version stuff worked out.
Hello Grog, I am wondering
Hello Grog,
I am wondering why the left bar in webgui is showing 2 Runtime, one empty and one with configuration tabs?
Let me know when I can push some more progress on the sub panels, I don't want to mess somethings you would already have written.
Do you think it would be possible to set two size options for the InMoov UI? I modified all the img and codes in order to have it almost half size smaller, it seems to me if we want to work with more windows on the screen that a smaller UI size would be necessary. I can post my variation for you to test.
I also think the JMonkey window is too big and because it cannot be resized it's a bit of annoying sometimes. It would be awesome if the green panel in JMonkey window could cliked to minimize or maximize, but maybe it's something not possible to do...
I am wondering why the left
I am wondering why the left bar in webgui is showing 2 Runtime, one empty and one with configuration tabs?
There are 2 processes - the browser and java ... but I'll work on filtering the blank one out.
Let me know when I can push some more progress on the sub panels, I don't want to mess somethings you would already have written.
You can submit pr's and I can incorporate them, we can continue to do this.
Do you think it would be possible to set two size options for the InMoov UI? I modified all the img and codes in order to have it almost half size smaller, it seems to me if we want to work with more windows on the screen that a smaller UI size would be necessary. I can post my variation for you to test.
Web ui stuff has the potential to resize itself based on viewing screen. This takes some effort and we have not yet begun dynamically changing based on screen that is being used, but its possible. Its not possible with swing (another reason to move to webgui)
I also think the JMonkey window is too big and because it cannot be resized it's a bit of annoying sometimes. It would be awesome if the green panel in JMonkey window could cliked to minimize or maximize, but maybe it's something not possible to do...
Good point I'll put it on my list
The issue of the glow is
The issue of the glow is complicated when there are other images next to it. I tried to remove the glow and the fingers got a little damaged. Just playing a little to see how it looks.