I think you've got a nice piece of work here GroG.
only wish I had found it earlier,
I have been scouring the net for something to help with the control of my Arm.
I did see the Inmoov project some time back but somehow I missed the myrobotlab service framework.
Inmoov is another wonderful project by Gael Langevin.
Opensource is the only way to fly for me!
I have been obsessed with making robots for many years.
and over the years I made several attempts at a humanoid arm and hand
Unlike Gael who was kind off pushed into it by a product design job gone bad.
apparently, he was asked to design a hand.
I knew what I wanted and that I should start with the hand, as it seemed to be the most complex mechanically to design and fabricate, So if I could succeed at making a robust and realistically moving humanoid hand. Well then the rest of the body would be no problem (with exception to the brain=maybe?)
intentions aside I am glad and grateful that he's doing or did this.
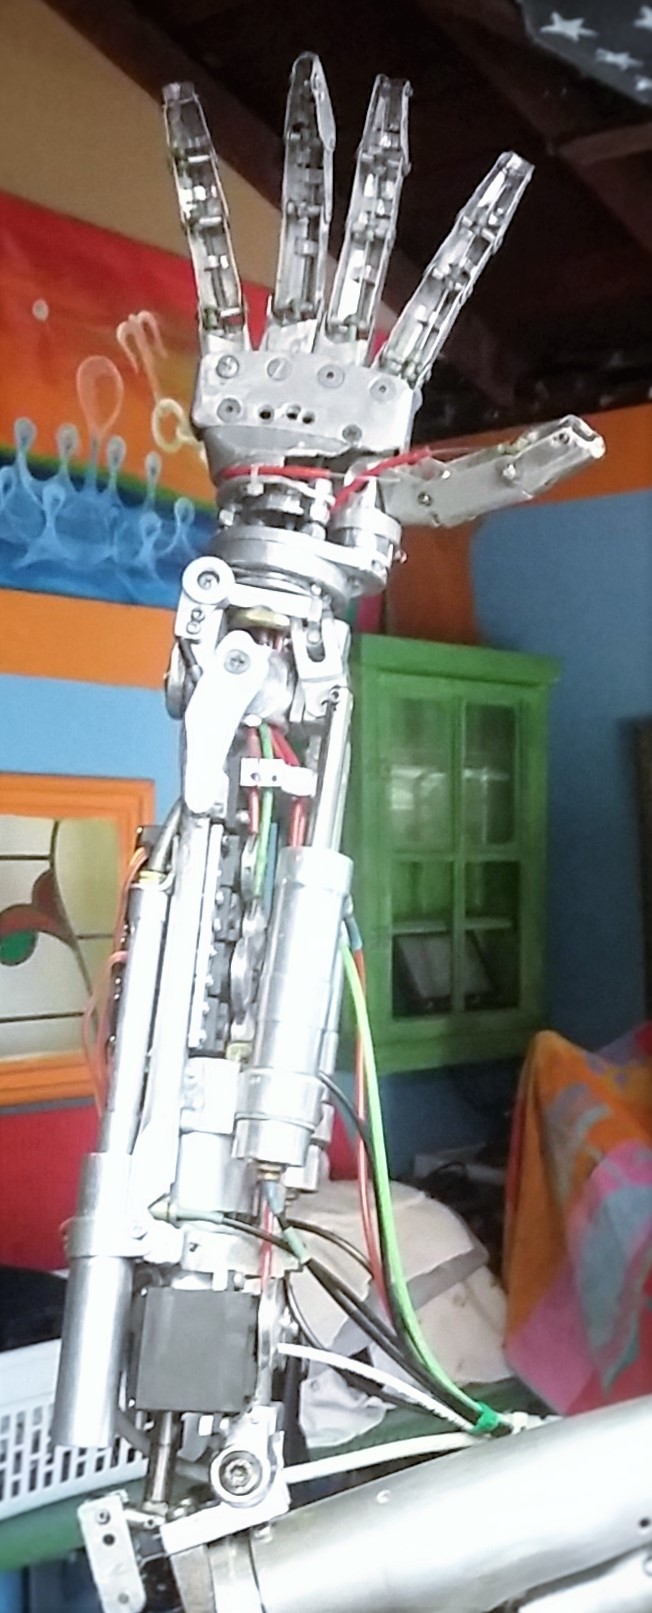
My Hardware system major components relations are as follows.
With one Arduino mega and PS2 wireless controller, the 2 incorporated 8x Relay board modules for control of 7 of these AirTac Pneumatic 5way solenoid valves, that in turn control the Pneumatic Cylinders. the all-important Feedback for the pneumatic system is not yet installed. At the moment only 14 of the 16 relays are connected to the solenoid valves. At some point, I will be adding a stepper motor needed for rotating the shoulder to get the full range of motion built into my arm. Of the 7 pneumatic valves most control a single cylinder double acting, except for one valve that is in command of two separate single-acting cylinders that act as one double, they are only connected mechanically through a cable wrapped around the wrist. thus effectively converting linear motion into rotary by means of a flexible cable so one retracts while the other extends (and can only retract by means of the other extending) Actualizing the rotation of the wrist back and forth, still another valve of the 7 controls a rotary cylinder to rotate the elbow right and left. and is also fundamentally just another double-acting cyl. that is converting linear motion to rotational. basically, 5 are the same type of cyl #6 and #7 are different in design but for all intents and purposes, these differences can be ignored.
The past couple of days I have managed to successfully use myrobotlab with Inmoov hand service
to control the finger servos using the sliders. Having issues with the gesture creator still. I would appreciate it if I can get any help with this and also with controlling the pneumatics within myrobotlab
Hello and Welcome Bartolobot
Hello and Welcome Bartolobot !
Wow .. you have a great project !
Yes, we would be thrilled to help you with your project ! Do you have video, I'd really like to see it in action.
We are busily trying to get out another release, so there are a lot of changes going.
I would suggest telling us the very "high level" first .. Do you have a set of goals to reach ? What would you like to see your robot doing ? What is the most important goal? What would the be the most exciting goal? Are there incremental goals ?
After that is would be good to know what you have connected in detail.
E.g. Arduino Mega to relay board to pneumatic tubes. Any sensors ? What other hardware can you Borg into it ? ;)
Very cool project Bartolobot.
Welcome aboard !
My goals and hardware set up
Thank You for the welcome,
GroG
world into reality. I have had a fascination with, Ai, cyborg, androids, bionic appendages and robots in general. Ever since I can remember. Over the years I have made several attempts at making an arm and hand. I still have the very first hand I made over 24 years ago. actually its more of a griper with just two fingers made of 1/4" Plexiglas cut on my table saw I'll post a pic of whats left of it. All the others were lost along the way.`The second one was made of PVC sheet scraps from a signArama store and had
three fingers it was more like a claw. Then there was one I made entirely of beer cans some solid copper wire and solder. among other robots.This reincarnation of the Arm and Hand is somewhere around the 6th, or 7th version. With each time I took what I learned and applied it to my next prototype. and Yes it is also a learning tool for me. except for Basic electrical engineering from school(at Rockwell) I am mostly self taught. the son of an auto mechanic who owned his own shop.
An experienced kitchen cabinet carpenter and handy man. I can rebuild my cars engine, Design and construct a house to making a custom electric guitar with built in sound effects, also a bit of an Artist with oil on canvas and many other media like wood and aluminum. There are no real professional reasons for my humanoid arm. Never the less I am not opposed to it.
I knew what I wanted to make and i knew I should start with the hand. as it seemed to be the most complicated to design and fabricate. Also the most important component in a humanoid robot as it is where all the work would happen. And if I could succeed at this well then the rest of the bot would be easy
Gael and I have lots in common, I also used my own hand as a reference to model it by.
actuating the fingers with tendons connected to reels on a servo, although this is something
I did many years ago on an early version. way before I saw anybody else doing this. I find It fascinating how people in different places, with similar set of problems can sometime find the same solution.
Similarly like Gael. I don't have plans to make the whole robot, but it may lead to that
first off my arm needs to function with realistic action. I would love to see it throw a baseball
the way a human would throw, Then maybe the next revision can throw 100mph,
or firmly grip a drill gun and accurately drill a hole or drive a screw, at the same time be able to gently
grip a paper cup full of water and without spilling pour it into a flower pot
So here are some recent pics
So here are some recent pics of my project
Bartolobot video
https://www.youtube.com/watch?v=-a4f3y3roLo
Video
Hi Bartolobot
Thanks for joining us. It's an advanced setup that you have there. I tried to watch your video but it seems to be marked private. I think you need to publish it for other people to be able to see it.
/Mats
fix video permission
Sorry about that Mats trying to fixing that now.........
OK try it now
So in this video I only had the elbow (flex only) , all the wrist DOF ( rotate, pan, yaw) connected and enabled from the pneumatic side of things. And all the finger Servos are also connected and enabled. but I was having some issue with my arduino sketch.
there was a finger sequence that kept looping and causing Command conflicts
what I would like help with
So I need help setting up myrobotlab to control all the actuators in my arm. At the moment I have successfully used the inmoov hand service to connect 5 of the six servos in my hand, but that only gives me manual control via the sliders. no success with the inmoov gesture creator. moreover how do I connect my 14 relays to myrobotlab? Theses relays switch on and off 14 solenoids on 7( 5 way 3 position 12v double solenoid valves). these valves have a middle position with both solenoids turned on air pressure is allowed to enter both sides of the cylinder that is connected to it. effectively locking the cylinder any where in between its range off travel.
my coding and programing skills are not up to par yet, So any help, would be appreciated here Guy's
GroG, Gael, or Mats anybody,
thank you
So you have servos and relays
So you have servos and relays + solenoids.
What are the relays currently connected too ? Another Arduino ?
The way MyRobotLab "typically" works is you have a computer somewhere, and into the computer you might have a bunch of micro-controllers. These would be Arduinos, BeagleBlackBoards, or Parallax Prop boards. The computer/raspi tells the micro-controllers what to do.
The computer is like the cerebral cortex - responsible for higher level functioning - like talking, and listening, and orchestrating .. The micro-controllers are like the hind-brain, or involuntary nervous system - making sure motors are running, at the correct position and all the critical yet mundane stuff ;)
So in pneumatic solenoid motion, I would think you want to start the Arduino service on the computer to control a Arduino which is hooked up to the relays of the solenoid. Since most pneumatic solenoids do not come with sensors to determine actual position - you'll probably want a sensor of some form to provide feedback so the micro-controller or even computer can tell, "Oh, my arm position is here at (X,Y,Z)"
There are a variety of strategies for "control" (Inverse Kinematics, Forward Kinematics, Pid control) and even a variety of potentially useful sensors (digital encoders, absolute position potentiometers, even cameras)
I hope this begins to answer some of your questions or generates new ones.
What I have connected
Yes GroG,
As I mentioned earlier, I have a mega updated from an uno due to not enough pins on the uno. Powered and Connected through USB cable to my computer.
I was using a Ps2x wireless controller which i found to be useful but not really what I was looking for, so its now detached. I would like a more autonomous approach, like inverse kinematics for example.
All the servos and relays are plugged into the digital pins on the mega with separate power supplys An old ATX computer power supply with 3.3v for the Ps2x RF receiver and breadboard 5v for the servos and Relays (signal side) and going through the relays output first-12v for the solenoid valves that in turn control Pneumatic Cylinders
At the moment only 14 of the 16 relays are connected to the 7 double solenoid 3 position valves. One of these double solenoid valves governs to 2 separate single acting cylinders that are only connected mechanically through a cable that wraps around the wrist and rotates the wrist so one retracts while the other extends, making them act like a single double acting cylinder.
Another double solenoid valve controls a rotary cylinder CW, and CCW rotating the Elbow
5 valves are all controlling standard double acting cylinders. All of which I custom made myself. There are two of these for the wrist PAN and TILT, another one also contained in the forearm, flexes the elbow. This cylinder would be akin to a human bicep muscle but only it is actually in the forearm of my robot arm.
One more cylinder is in the tricep area but acts more like a Deltoid to lift the arm up from the shoulder together with the last cylinder hidden down in the stand, I get X and Y freedom in the Shoulder . I will be adding a stepper motor to rotate the shoulder. Which by the way is an old Direct TV dish stand..
As far as sensors or feedback for my Pneumatic system. There are none installed yet but I am considering my different options at the moment . I think I would like more than one position feedback system. like limit switches at the extremes of travel for each cylinder. For this I have been thinking about adding a magnet on the piston inside of each cyl. together with some hall effects sensors at the ends of travel. and some potentiometers for the rotary joints. and also a secondary method, like a camera or a kinect maybe. I think some redundancy here is a good idea.
I knew I might be adding sensors to the joints, and took this into consideration as I was building so some can be easily added to my project.
The reason I have not added the sensors yet is that i was hopping to get the arm functioning and moving through full range of motion to get a better idea if any changes have to be made where exactly to put the sensors . Or maybe i find a way to accomplish position feed back with out any physical sensors.
What do you think?
Driving a relay
The principle for driving a relay is the sames a for blinking a LED. So you can find a short code snippet here to be able to use the pin of the Arduino to drive the relay.
Just change the connect to use the port where the Arduino is connected, and the pin to the pin where your relay is connected. Just be aware that if you connect the relays directly to the Arduino you may have to add a protetive diode.
https://github.com/MyRobotLab/pyrobotlab/blob/master/home/Mats/ArduinoB…
I think the easiest way to get a sensor input is to use a simple potentiometer in one of the rotational joints, just like it's done in the InMoov robot.
/Mats
about drivig my relays
Forgive my ignorance Mats,
not sure I understand this, Do I need to run a separate arduino to put this blink snippet into a sketch, or can all my relays and servos, on one arduino mega and myrobotlab play tougher happy? I know how to do it from the arduino IDE. I did have a functioning sketch with a Ps2x (wireless PlayStation controller) . Although not a very good one. Due to my lack of programing skills. I had lots of communication errors and timing issues. May be I haven't mentioned that I am a beginner at programing , But I am pretty familiar with the arduino , I have been using one with a GRBL shield +some steeper motors in My custom made CNC machine for about 3 years now. so no problem writing simple sketches for arduino.
OH and I did not use diodes on my arduino relay outputs, opps! you think that was causing some of my issues?
For Python and MRL I only know what I've gotten out of the YouTube mrl tutorials. and there aren't to many good ones
I'm assuming that you can upload arduino sketches through Myrobotlab and also run inmoov scripts all to one arduino I just haven't figured that out.
If you can point me to some better tutorials for MRL, I would apriciate it.
MRL, servos and relays
MRL can play nice with all the things that you want to do. No need for a separate Arduino for the relays or servos. The way MRL is built you have a service called Arduino and a sketch called MRLComm that communicates with each other over the USB connection from your PC to the Arduino.
Then you can program everything ( almost ) using MRL Python. So the program I linked to is not a Arduino sketch. It's a Pyton script that executes in MRL.
So to get started you need to upload the MRLComm sketch to the Arduino. It can be uploaded from the WebGui or you can use the Arduino IDE to upload it. It's nice to be able to do it from the WebGui, but I think it's better to do it thru the Arduino IDE the first few times to understand what's happening behind the scenes. So start the Arduino IDE. Then open the sketch C:\MRL\resource\Arduino\MRLComm\MRLComm.ini and upload it to the Arduino. You may have it in a different folder depending on where you installed MRL. If the upload was OK, then close the Arduino IDE.
Next step is to start MRL. You will find a tab Python tab. That's where you can write and execute python scripts, like for example the one I linked to.
You can find and start many different services in the Runtime tab. You probably want to play with one or more Servo services. You need to start one Arduino service to be able to communicatre with the Arduino ( MRLComm ). Then you probably want to start one Servo service for each finger and attach them to the Arduino and a pin. After that you can control your servos from the GUI.
To use the relays, you can start with the script I linked to and just change the pin to the pin where your relay(s) are connected. Open the python tab and copy/paste the script. Press the red button to execute the script.
I hope this helps to get you started.
/Mats
Great info Bartolobot. Can
Great info Bartolobot.
Can you allow embedding of your other video so we can have both videos on this post. I like keeping all info together for others in one place. Its so others can find it more easy to help us. And that means not having them search or do more work looking for more information.
The first suggestion I have is, "Get fine control first - worry about all the rest later"
What I can tell from your video .. you have fine control of the fingers .. good.
BTW - just want to mention that the metal work and re-use of existing stuff is simply awesome !
Ok.. but it 'looks like' the peumantics are not controlled to the same degree...
I would kind of expect this with relays and pneumatics.
So lets analyze further .. "fine control" means exceptionally small increments of movement at potentially very high speeds.
I'd be curious of how fast you can drive the servos, we can send a pulse train to the solenoids. Have you done this ? .. FETS/MOSFETS and transistors are a lot faster than relays.
Is it possible to set up a test to see what the relays are capable of doing? In regards to smooth, fast, and accurate movement ?
allow embedding of your other video
1) allow embedding of your other video....Done!
2) send a pulse train to the solenoids Have you done this ? No! how?
3) FETS/MOSFETS and transistors are a lot faster than relays. this will give me finer control of my pneumatic cylinders?
4) is it possible to set up a test to see what the relays are capable of doing? I will work on setting up a test I'll need some time to connect and revert back to control with ps2x controller on the uno with my old sketch.. I'll comment out the servo parts so i will only have control of the pneumatics and make a video.
I'll be back will that ASAP!
thanks GroG
1) cool .. 2) pretty easy is
1) cool ..
2) pretty easy is a Python script + Arduino Service .. more on this later
3) Potentially Yes.. but lets see what your relays will do.
Lets consider some of the constants and variables you are working with:
4) Do you need the ps2x controller ? Would it be easier just to write a couple test routines in Python using an Arduino service to control the pneumatics?
5) Are there any hard limits to the arm? Is it possible to self destruct, or damage it ? We don't want to accidently destroy your hard work, so it would be good if you could tell us the possilbe weak points, things not to do, for example not over-extending the elbow. Or not to keep a relay on for an extended period of time. etc.
Relay speed - datasheet
Under 8. Performance are the relay speeds
the Operation time......10MSec. Max
Release time........5MSec. Max
and here is some data on my solenoid valves, Although I don't see any working speed info!
I'll try to track this missing info down.
Description
Specification:
Product Name: Pneumatic Solenoid Valve
Model: 4V230C-08
Working Medium: 40 Micron Filtered Air
Motion Pattern: Inner Guide Type
Type : 3 Position 5 Way
Material: Resin, Plastic
Working Voltage/Current/Power: DC12V, 120mA, 3.0W
Temperature: Rise 35°C
Operating Pressure : .5 ~ 8kgf/cm2
Effective Area: 12mm²
Port Connection: Air Inlet =Air Outlet=PT 1/4, Exaust =PT 1/8
AirInlet Diameter: 1.15cm/ 0.45"
Air Exhaust Diameter: 0.85cm/0.335
Black Pull Into Diameter:1.1cm/ 0.43"
Wiring Form: Direct Lead Wire or Connector
second part of your question
Plastic vs. Metal... I think if you want your robot to do any real work in the real world. Metal especially if you want to keep cost to a minimum. even better if you can recycle old junk and give it a new glorious life.
Considering currant 3D printing technology and the tremendous force on these joints. I don't see how? an all plastic robot can perform tasks comparable to the average able body human. I would like my robot to do more than hand gestures
Of course if I had a big enough budget. I would use materials like Carbon fiber , titanium, but I don't think that is what we're about here!
My robots joints are strong enough to withstand all the cylinders max force's without causing damage. I do have hard stops engineered into my design, It has been tested with 60 psi pressure (no video ) from my silent compressor and 1gal. tank also re-purposed from an old frig. compressor. You might ask well how do you engineer these features into parts that are recycled? Well you might notice that nothing is unmodified I have made lots of modifications to these parts, e.g. choping chunks off welding on others, drilling, honning, cutting, and bending. Some parts have been made from scrach with new raw materials. (i.e. all the cylinders) not to mention carfull planing and testing.
regretfully I don't have any video of those tests so I will be working on getting another one going to put in on video here for you guys.
only reason I disconnected the Ps2x controller is mostly due to my weak coding skills and I figured with MRL I wouldn't need it. but I'll have it back on for the video coming soon.
ohh and the relays can't stay on for prolonged periods of time it causes the solenoids coils to heat up but this is in the order of minutes
I can't thank you enough or began to express my appreciation for the help!
Okay, Great info. Very
Okay,
Great info. Very helpful. Nice to have one post collecting all the details. Much more easy to find all the info, and good for new people interested or trying to help out.
So yes, video is extremely useful, and so easy to do now. If a picture is worth 1000 words, then a video is worth 1000 X 60 words per second ;)
Soooo.. yes the next step is to show how fine control you can get with your current setup in a video and we can see if we can help improve that. And possibly control it with a program.. which in turn will allow you to hook the "program" up to other services or sensors or things of interest.
kinematics, servo control and a whole lot more!
Awesome robot arm! Welcome! I'm sure we'll be able to get you dialed in for full control of the arm. In addition to being able to control the servos / motors / relays,
I'd be happy to see if you could use the Inverse Kinematics service for the robot arm to actually be able to make it operate like an industrial robot arm.. specify a coordinate in space, x,y,z, roll, pitch, yaw and have it solve the angles for you...
very cool looking! It also seems very fast from your videos.. I love it!
Inverse Kinematics
Yes! I like Inverse Kinematics
looking into that now. I have some learning to do.
thank you! kwatter
Delayed video, technical difficulties
Robot has sustained a devastating injury to its wrist and in the operating room now, it snapped a major tendon responsible for rotating the wrist. it was made of Fishing steel braided leader 100lbs TEST, there just too much friction in the tendon raceways, I will be installing an upgrade to 150 Test leader and guides that should reduce some friction
sorry guys I'll try to get a good video soon but might not be till tomorrow its now 10;00 pm where at. I'm dont know how long i can stay up now "need to recharge my bateries" so sorry about that again.
I did by the way find another previously recorded Video to demonstrate the speed of my system!
just give me a couple min's
found video
https://youtu.be/zbT_nee8QPw
For future reference
For future reference ;)
http://myrobotlab.org/content/helpful-myrobotlab-tips-and-tricks-0#video
Thanks for sharing the
Thanks for sharing the videos.
So from the video I can see very fast movement which ends in what I would suspect a physical stop.
What I would be interested in seeing, is the maximum 'control' you can currently demonstrate.
This is where MRL could begin to help you, is speed, control, and positioning.
Hope repairs go well and excited to see your fine control demonstration.
regarding my arduino sketch
Would it be too much to ask if you guy's can take look at my sketch i plan to use for the compleate overall test, I decidded to have evrything connected to my Mega board. Servos, Relays, ps2x,etc. Running the latest arduino sketch i was working with but IT has many issues I know it can be easlly improved with a timer interupt rutine or somthing like that. And or creating some classs and functions and my use of arrays is if''y?
This would be a tremendos help to me ,
so if you will here is my code,
P.S. code discription and futher details are in the code header.
hi I just look quickly to
hi
I just look quickly to your sketch
the first thing I would do to improve your sketch is to get rid of all the delay()
delay are bad in the way that the arduino stop everything while the delay timer expired. So if you want to use sensors, the sensor will never be check with the delay().
use the millis() or even micros() to set your own timer if your goal is to prevent entering a part of code to fast
by example
unsigned long nextCheck=0; (in the global space)
unsigned long now = millis();
if (ps2x.Button(PSB_BLUE) && now > nextCheck) {
Serial.println("X just changed");
ThumbR.write(170, 200, false);
ThumbF.write(5, 200, false);
// delay(175);
nextCheck = now + 175;
}
Unnecessary Delays in my test code
Thank you calamity
I have tried to use millis . I just don't understand it completely and I end up ruining the code. so after the button x is pushed it begins the servo move and it adds what would of been my delay (175 Millis) to "now" which represents the time elapsed since the start, then "next check" recordsor holds the answer.
So lets say e.g.. that "now" is equal to 400 at time of button push (nextCheck = 400+175)
nextCheck = 575 at the time of button push and "now' it gos back to 400 and keeps on running along with nextCheck since nextCheck = now+(the amount of time needed to execute the move)
"now" can never be grater then nextCheck unless your trying to push a button during another move ?correct?
OK I think I got it!....... no need to include #TimerOne right?
I'll give it a shot
what it do is when the code
what it do is when the code enters an conditional part, it set a variable to now+delay.
on the next loop, it will check if enough time as pass before entering the conditional part again (or any code part that you don't want to run before that time is complete.
So your main loop will continue to run and check other things. if you use delay, the main loop will stop and won't do anything until the delay is done.
no need to include Timer1 or any timer, you are not using interrupt here, just the millis() counter
arduino sketch Prior to ps2x need help fix errors
I'm getting different types of errors I cant figure it out?
heres the code its unfinished but I would like to get what I have so far working before I add more.
Ahoy Bartolobot, So last I
Ahoy Bartolobot,
So last I remember the objective was to demonstrate/video the best " fine control " you achieved and we would try to improve on that.
It looks like you are having some challenges getting back to that control state, which is understandable ... Robots are tempremental beasts !
The posting of your original control code is very helpful.
It looks like you used the game pad's buttons primarily to control the relays, they would switch the appropriate relays, then a delay (not sure why - unless you auto switched the relays off)
Now that we have your code perhaps it would be a good time to begin to port the functionality to MRL.
With MrlComm sketch installed - the control and details will be in Python running on MRL. Its nice this way because it allows changes to be done in a scripting language vs compiling and uploading for each change.
We have a Joystick service and I'm sure your type of Joystick is supported. Probably the first thing is to download the latest MRL, install all services, and begin to experiment with the Joystick service.
Getting back on track
Ahoy there Greg,
1) Yes that is the objective, just bear with me. I need a little more time to get there. Since the wrists rotational tendon frailer I decided to go ahead with some upgrades to this area of the hand, For which I have been planning on doing. Now that I have the thing apart I should take advantage.
yes there is an auto switch off in my code.
not sure how to do this can an arduino sketch run on python without making major changes?
yes I like the joy stick to be there only for test, setups, like manual override control, but ultimately I would like my robot to have a more autonomous method of locomotion.
Bartolobot surrogate power plant, rapid fire Pnuematics
Demonstration test on No5 Check the decibels!
I just wanted to share how quiet this setup is.
Silent Compressor from an old refrigeration unit married with a tank and regulator the other Senco unit is just an organ done for a secondary tank. more air capacity less motor run time with the exception of the initial fill. And no I did not alter the sound in any way, I don't know how well the MIC is pickling up the sound. I will use my sound meter app. and report the levels back here ASAP.
The reason I say surrogate, this set up is just my test rig but if you take a look at the stand for my robot there are 3 green tanks that I plan on using For my final pressure storage facilities.
oh, and you get a look at my custom DIY CNC machine which I plan on turning into a CNC / 3D printer combo!
https://youtu.be/_VBV-2V33w0
Upgraded Wrist Twisting Actuators
Finally the repairs and up grades are done,
Demonstration of that on video
what I've done here Is an overhaul to the cylinders
each cylinder has around 10 "O"rings some of which were replaced
the major changes were in the middle the connecting cable
And the flexible helical steel tubing came off a bike brake cable ,I used just the tubing striped off the outer plastic and modified its inside diameter and flexibility by stretching it the coils separate but also get tighter.then theres a plastic tube inside another slightly larger plastic tube with the cable all go inside this modified bike tubing.
Here ti is in action!
Wow .. really impressive work
Wow .. really impressive work Bartolobot !
The speed is amazing ...
I assume you want positional control too ?
back on the chase
Sorry guys I had to disconnect myself for a while with the biz.
current state of affairs
So with my currant coding abilities and comprehension I'm afraid this is the best I can muster A semi functional anti productive and frankly unacceptable arduino sketch. It does however have a purpose in demonstrative function of 2 things
1) my Appendage's range and its speed of the individual joint motions(currently lacking coordination)
2) my inability to write a satisfactory sketch
from GorG
The delays were presumably to allow the motion to complete its course of action before accepting a new course of action for the given actuator. The draw back now so painfully apparent is that it delays everything in the sketch for that given delay time. It remains this way due to my failure at achieving function without delays
let alone could I begin to Port the functionality to MRL. What? clueless
Please bear with me GorG and others
The overdue video attached
[code][code]
/*
created by Bartolobot mando1373@gmail.com on May 16 2016 for servo
control of a Humanoid hand also Created by bartolobot.
now May 30 2016 I've added a PS2X (PlayStation 2 wireless controller)
8 Relay module for control of solenoid valves that in turn control Pneumatic Cylinders
at the moment only 8 relays are connected to four double solenoid valves also have a single
solenoid valve but ranout of relays (I will be adding more relays, valves and one or two steppers
to get the full range of motion built into my Arm)
that's 8 relays 4 valves 5 cylinders one valve gos to two single acting cylinders that are only
connected mechanically so one retracts while the other extends
and the other 3 dubble solenoid valves control three separate dobble acting cylinders
I've added a timer function for gestures and two LEDs for indicators
changed the 8 in two arrays to 9 7-18-16 5am
*/
#include <PS2X_lib.h>
#include <VarSpeedServo.h>
#define RELAY_ON 0
#define RELAY_OFF 1
PS2X ps2x; // create PS2 Controller Class
int error = 0;
byte type = 0;
byte vibrate = 0;
const byte Relay[15] = {22, 24, 26, 28, 30, 32, 34, 36, 38, 40, 42, 44, 46, 48};
VarSpeedServo Index;
VarSpeedServo Middle;
VarSpeedServo Ring;
VarSpeedServo Pinky;
VarSpeedServo ThumbF;
VarSpeedServo ThumbR;
const int IndexPin1 = 4; // the digital pin used for the servo
const int MiddlePin2 = 3;
const int RingPin3 = 6;
const int PinkyPin4 = 5;
const int ThumbFPin5 = 7;
const int ThumbRPin6 = 8;
unsigned long nextCheck=0;
unsigned long currentMillis = 0;
void setup() {
for (byte c = 0; c <14; c++) {
pinMode(Relay[c], OUTPUT);
digitalWrite(Relay[c], RELAY_OFF);
}
Index.attach(IndexPin1);
Middle.attach(MiddlePin2);
Ring.attach(RingPin3);
Pinky.attach(PinkyPin4);
ThumbF.attach(ThumbFPin5);
ThumbR.attach(ThumbRPin6);
// ThumbR.write(90, 145, false);
// ThumbF.write(90, 145, false);
// Index.write(90, 145, false);
// Middle.write(90, 145, false);
// Ring.write(90, 145, false);
// Pinky.write(90, 145, false);
Serial.begin(57600);
//CHANGES for v1.6 HERE!****PAY ATTENTION****
error = ps2x.config_gamepad(13, 11, 10, 12, false, true); //setup pins and settings: GamePad(clock, command, attention, data, Pressures?, Rumble?) check for error
if (error == 0) {
Serial.println("Found Controller, configured successful");
Serial.println("Welcome to the bartolobot Arm Control System");
Serial.println("Try out all the buttons, X will vibrate the controller, faster as you press harder");
Serial.println("holding L1 will print out the analog stick values");
//Serial.println("Go to www.billporter.info for updates and to report bugs");
}
else if (error == 1)
Serial.println("No controller found, check wiring, see readme.txt to enable debug. visit www.billporter.info for troubleshooting tips");
else if (error == 2)
Serial.println("Controller found but not accepting commands. see readme.txt to enable debug");
else if (error == 3)
Serial.println("Controller refusing to enter Pressures mode, may not support it");
//Serial.print(ps2x.Analog(1), HEX);
type = ps2x.readType();
switch (type) {
case 0:
Serial.println("Unknown Controller type");
break;
case 1:
Serial.println("DualShock Controller Found");
break;
case 2:
Serial.println("GuitarHero Controller Found");
break;
}
}
void loop(){
/* You must Read Gamepad to get new values
Read GamePad and set vibration values
ps2x.read_gamepad(small motor on/off, larger motor strength from 0-255)
if you don't enable the rumble, use ps2x.read_gamepad(); with no values
you should call this at least once a second
*/
if (error == 1) //skip loop if no controller found
return;
if (type == 2) { //Guitar Hero Controller
ps2x.read_gamepad();} //read controller
else { //DualShock DETECTED
ps2x.read_gamepad(false, vibrate);{ //set large motor to spin at 'vibrate' speed
if (ps2x.Button(PSB_START)) { //all relays off and a list of combos to serial monitor
Serial.println("Start is being held");
Serial.println("(START ------ All Off)");
Serial.println("----button combos-------------");
Serial.println("(L2 & Tri --- Finger sequence)");
Serial.println("(L2 & DN ---- Elbow strait)");}
}
if (ps2x.Button(PSB_SELECT)) { //******************SELECT********************************
Serial.println("Select pressed");
}
if ((ps2x.Button(PSB_L2)) && (ps2x.ButtonReleased(PSB_GREEN))) { //******L1 and triangle******Finger sequence
Serial.println("(L2 and Tri) Finger sequence");
Index.write(0, 240, true);
Middle.write(180, 240, false);
Ring.write(0, 240, false);
Pinky.write(180, 240, false);
ThumbF.write(160, 230, false);
ThumbR.write(10, 200, true);
ThumbF.write(5, 200, true);
ThumbR.write(180, 200, false);
Index.write(180, 220, false);
Middle.write(0, 220, false);
Ring.write(180, 220, false);
Pinky.write(0, 220, true);
Pinky.write(180, 220, false);
delay(250);}
if ((ps2x.Button(PSB_R1)) && (ps2x.ButtonReleased(PSB_PAD_UP))) { // Wrist UP
Serial.print("WRIST Hyperextend UP");
Serial.println(ps2x.Analog(PSAB_PAD_UP), DEC);
digitalWrite(Relay[6], RELAY_ON);
digitalWrite(Relay[4], RELAY_ON);
digitalWrite(Relay[7], RELAY_OFF);
digitalWrite(Relay[5], RELAY_OFF);
delay(150);}
if ((ps2x.Button(PSB_R1)) && (ps2x.ButtonReleased(PSB_PAD_DOWN))) { //Wrist DOWN
Serial.print("WRIST CURRL DOWN");
Serial.println(ps2x.Analog(PSAB_PAD_DOWN), DEC);
digitalWrite(Relay[7], RELAY_ON);
digitalWrite(Relay[5], RELAY_ON);
digitalWrite(Relay[6], RELAY_OFF);
digitalWrite(Relay[4], RELAY_OFF);
delay(150);}
if ((ps2x.Button(PSB_R1)) && (ps2x.ButtonReleased(PSB_PAD_RIGHT))) { //WRIST RIGHT
Serial.print("WRIST RIGHT");
Serial.println(ps2x.Analog(PSAB_PAD_RIGHT), DEC);
digitalWrite(Relay[4], RELAY_ON);
digitalWrite(Relay[7], RELAY_ON);
digitalWrite(Relay[6], RELAY_OFF);
digitalWrite(Relay[5], RELAY_OFF);
delay(150);}
if ((ps2x.Button(PSB_R1)) && (ps2x.ButtonReleased(PSB_PAD_LEFT))) { //WRIST LEFT
Serial.print("WRIST LEFT");
Serial.println(ps2x.Analog(PSAB_PAD_LEFT), DEC);
digitalWrite(Relay[6], RELAY_ON);
digitalWrite(Relay[5], RELAY_ON);
digitalWrite(Relay[4], RELAY_OFF);
digitalWrite(Relay[7], RELAY_OFF);
delay(150);}
if ((ps2x.Button(PSB_R2)) && (ps2x.ButtonReleased(PSB_PAD_RIGHT))) { //R2 & RIGHT twist wrist CW
Serial.println("WRIST CW");
digitalWrite(Relay[0], RELAY_OFF);
digitalWrite(Relay[1], RELAY_ON);
delay(250);}
if ((ps2x.Button(PSB_R2)) && (ps2x.ButtonReleased(PSB_PAD_LEFT))) { //twist wrist CCW
Serial.println("WRIST CCW");
digitalWrite(Relay[0], RELAY_ON);
digitalWrite(Relay[1], RELAY_OFF);
delay(250);}
ps2x.read_gamepad(false, vibrate);
vibrate = ps2x.Analog(PSAB_BLUE); //this will set the large motor vibrate speed based on
//how hard you press the blue (X) button
if ((ps2x.Button(PSB_R2)) && (ps2x.ButtonReleased(PSB_PAD_DOWN))) { // relax extend elbow strait
Serial.println("elbow strait R2 & DN");
digitalWrite(Relay[8], RELAY_ON);
digitalWrite(Relay[9], RELAY_OFF);
delay(150);}
if ((ps2x.Button(PSB_R2)) && (ps2x.ButtonReleased(PSB_PAD_UP))) { //flex (bend) elbow
Serial.println("FLEX ELBOW R2 & UP");
digitalWrite(Relay[8], RELAY_OFF);
digitalWrite(Relay[9], RELAY_ON);
delay(150);}
if ((ps2x.Button(PSB_L2)) && (ps2x.ButtonReleased(PSB_PAD_UP))) { // shoulder deltroid lift
Serial.println("SHOULDER-UP L2 & UP ");
digitalWrite(Relay[3], RELAY_ON);
digitalWrite(Relay[2], RELAY_OFF);
delay(250);}
if ((ps2x.Button(PSB_L2)) && (ps2x.ButtonReleased(PSB_PAD_DOWN))) { // shoulder deltoid Down
Serial.println("shoulder-DN L2 & DN");
digitalWrite(Relay[3], RELAY_OFF);
digitalWrite(Relay[2], RELAY_ON);
delay(250);}
if ((ps2x.Button(PSB_L2)) && (ps2x.ButtonReleased(PSB_PAD_RIGHT))) { // Bicept Down
Serial.println("Bicept-DN L2 & DN");
digitalWrite(Relay[12], RELAY_OFF);
digitalWrite(Relay[13], RELAY_ON);
delay(250);}
if ((ps2x.Button(PSB_L2)) && (ps2x.ButtonReleased(PSB_PAD_LEFT))) { // Bicept Down
Serial.println("Bicept-DN L2 & DN");
digitalWrite(Relay[13], RELAY_OFF);
digitalWrite(Relay[12], RELAY_ON);
delay(250);}
// there will be about 15 hand grips used to manipulate, grip objects and make gestures
if (ps2x.Button(PSB_GREEN)) { // All fingers closed sustained grip
Serial.println("Triangle pressed");
Index.write(3, 255, false);
Middle.write(175, 255, false);
Ring.write(3, 200, false);
Pinky.write(190, 255, false);
ThumbF.write(5, 180, false);
ThumbR.write(170, 180, false);
delay(100);}
if (ps2x.Button(PSB_RED)) { //Open all fingers - relax grip
Serial.println("Circle pressed");
Index.write(179, 100, false);
Middle.write(2, 100, false);
Ring.write(180, 100, false);
Pinky.write(2, 100, false);
ThumbF.write(2, 100, false);
ThumbR.write(175, 100, false);
delay(275);}
if (ps2x.Button(PSB_PINK)) { //Pinch closed hand
Serial.println("Square pressed");
Index.write(60, 140, false);
Middle.write(150, 200, false);
Ring.write(5, 200, false);
Pinky.write(179, 255, false);
ThumbF.write(110, 140, false);
ThumbR.write(90, 140, false);
delay(275);}
if (ps2x.Button(PSB_BLUE)) {
Serial.println("X just changed");
ThumbR.write(170, 200, false);
ThumbF.write(5, 200, false);
delay(275);}
if (ps2x.NewButtonState()) { //true if any button changes state(on to off, or off to on)
Serial.println("Any button was pressed");}
if(ps2x.Button(PSB_L1)) { // print stick values if true
for (byte x = 0; x <14; x++) {
pinMode(Relay[x], OUTPUT);
digitalWrite(Relay[x], RELAY_OFF);}
Serial.print("Stick Values:");
Serial.print(ps2x.Analog(PSS_LY), DEC); //Left stick, Y axis.
Serial.print(",");
Serial.print(ps2x.Analog(PSS_LX), DEC);
Serial.print(",");
Serial.print(ps2x.Analog(PSS_RY), DEC);
Serial.print(",");
Serial.println(ps2x.Analog(PSS_RX), DEC);}
delay(200);
}
}
[/code]
[/code]
Hi Bartolobot, Thanks for
Hi Bartolobot,
Thanks for posting.
The Servos can be controlled by MRL - there has been considerable amount effort put into MRL to control all the various attributes of a Servo, and make them easily accessable from other parts of MRL.
This would be possible by just replacing the sketch with MRLComm .. which I think you have mentioned you have done.
So that gets us to the Relays & Pistons.
Being effectively 2 electrical pins on the Arduino, MRL can certainly control this too.. However, I'm still unclear about "all" of the cause & effect.
For example what - happens when both coils of both relays are off ? or both are on ? With both off does this release pressure from both sides of the piston? What proportional control can you manage with a piston and 2 electrical bits? We could pulse them very rapidly, have you tried this ? Relays have much lower limit of acceptable pulse range than FETs.
We should start simple always. Just a single joint, and see what pulsing does? Also you mentioned you had position sensors - where and what kind are they?
Brass Tacks
Ok.. so if you want control & integration - you want to make things simple first.
Lets make it simple.
Servos & All other joints except for the one I've outlined are dead to me :)
What is the name of this piston ?
How many digital pins/relays are assigned to it ?
Througout the video I see it fully extended or fully retracted, have you ever been able to control the location where its not fully extended or retracted ?
What about speed variances? Can you get a variety of speeds out of it ?
Its great you have position sensors, but first you need control, or the sensors wont be very useful.
I suspect that rapid pulsing of the relays will give you some position & speed control, but I'm not sure of how capable the relays are at handling a potentially high frequency of pulses.
Can we experiment with this single joint? Because, what we learn and develop for a single simple system, you can extrapolate over all similar joints/pistons.
Brass Tracks
Thank you! GroG
Good Questions.
So with both coils off it does not necessarily release the pressure but depending on how much force is on the cylinder it slowly loses pressure. Probably due to small leaks somewhere along the air system for that particular side of the cylinder that still has pressure in it. Which I will sort out eventually. I belief that these valves are normally closed with the coil deenergized and should hold its position and pressure. I've added a 3lbs wight to the forearm and raised the arm strait out then deenergize coil in this next video to demo this.
The Coil can also be left on if it need be. To hold at the extent of the cylinder, Or Both coils for anywhere in between. I have not yet tested the second method for lack of a positioning system and ability to rapidly fire one coil to start in a dir. followed by the second coil to stop and hold. not sure how long they can safely remain on but I know I can and have done it for more than a few minuets on one coil but it may even be hours.
As far as control of speed with my current setup it only can be set to a specific point and relative to the bore size of a given cylinder this can be done globally through the manual adjustment of the regulator for the air supply (now set around 50-60 Psi) or by restricting exhaust on any side of any cylinder via a needle valve. can be located directly on cylinder port fitting or in my case on the valve itself assuming a separate exhaust for each side is available like on my valves(5 port, 3 position, 2 coils). locating the exhaust valve directly on the cylinder enables much faster speeds but also requires more room and accessibility for the valve.
Pulsing the coils sounds like a great idea! I would like to see what kind of results can be archived with a pulse train to the relays before considering FETs.
1) this piston in my code is called the shoulder deltroid here.
[code] if ((ps2x.Button(PSB_L2)) && (ps2x.ButtonReleased(PSB_PAD_UP))) { // shoulder deltroid lift
Serial.println("SHOULDER-UP L2 & UP ");
digitalWrite(Relay[3], RELAY_ON);
digitalWrite(Relay[2], RELAY_OFF);
delay(250);}
if ((ps2x.Button(PSB_L2)) && (ps2x.ButtonReleased(PSB_PAD_DOWN))) { // shoulder deltoid Down
Serial.println("shoulder-DN L2 & DN");
digitalWrite(Relay[3], RELAY_OFF);
digitalWrite(Relay[2], RELAY_ON);
delay(250);}
[code]
Two pins associated with it are pin no.s 26 and 28 as they are in the 2nd and 3rd pos. of my relay array
[code]const byte Relay[15] = {22, 24, 26, 28, 30, 32, 34, 36, 38, 40, 42, 44, 46, 48};[code]
Wow, I really appreciate
Wow,
I really appreciate your detailed and concise answers Bartolobot. Your thought processes and descriptions are clear and logical. We admire your logic.
There should be 4 states :
off off = close state - hold, except for leaks
on off = lift with force
off on = down with force
on on = ????? ... I assume its "lock" with power ? a force lock pressure on both sides of the piston ?
We are getting closer ...
The next part would be. Are you familiar & comfortable loading MRL & its Arduino sketch into your system. If I remember correctly you said you use it to control your servos. What version are you currently using? Do you know how to the the "latest" - Do you know how to load an Arduino sketch with the latest ?
If your interested I would be excited to make a Piston service. I would propose a Piston.move(pos), Piston.moveTo(pos) & Piston.setPowerLevel(pwr)
Basically it would be the same interface as a MRL Motor.
A simple script might look like this.
deltoid = Runtime.start("deltoid", "Piston")
arduino = Runtime.start("arduino","Arduino")
deltoid.attach( arduino, 8, 9)
deltoid.setPowerLevel(30)
deltoid.moveTo(30) # this could only happen with sensor feedback
deltoid.move(40)
What do you think?
Your Help I Too Appreciate
Thank you GroG,
Your Help I Too Appreciate that. Not to mention your MRL service Splendid!
I apologize for my slow response, I've just been busy with other stuff. Been hard to find time for my Robotic endeavors.
With Persistence a drop of water will penetrate stone eventually!
I Love the Spock reference, Big fan I am of Star Trek .
1) The four states you describe are correct
2) familiar with MRL I am... Comfortable not so much.. due to lack of practice.
and Yes i have used it to control my servos.
3) I am using version 1.0.119, - I don't think I know the latest?
No not sure how.
4)Yes this sounds very Exciting
Piston.move(pos), Piston.moveTo(pos) & Piston.setPowerLevel(pwr)
can you walk me though it some of the way
Most Appreciate All of your help so far.
Thanks GroG.
Hi Bartolobot, Ok - a lot
Hi Bartolobot,
Ok - a lot has changed since 119 (we are now on 1782 :)
The MRL community has added a lot of features since then...
They include WebKitSpeechRecognition and ProgramAB - which has been a popular way to talk to your bot, and get it to do commands.
At the moment I am delayed to do a refactoring task which I must complete before moving on to other fun projects (like the Piston service !)
But if you have spare cycles in the meantime I'd encourabe you to peek at some of the Tutorials - they will explain some of the new services & and to potentially use them.
http://myrobotlab.org/tutorials
Cheers !
Hi Bartolobot, You have
Hi Bartolobot,
You have updates ?
It's been a while - hope you are well. I watched your No4 test video, but without expanation, not sure how much has been updated.
Regards,
GroG
update reply to GroG
I'm good besides getting T boned by a semi-truck carrying a heavy Load doing 45 mph on an Intersection. Getting dragged about 50yards across the 4 lane intersection all the way to the other side that's 8 lanes. strait into the steel signal light pole but not before hitting the curb sideways creating the 2nd impact from the truck that broke 1 Rib and fractured 2 more.didn't feel a thing yet because i still had the pole coming strait at me or rather me at it. but that's how it felt and luckily it hit right behind the driver door spun me around 180 degrees and I came to a stop the truck stopped at the curb but it had sheered the whole back end of my rover and the top of my fuel tank .I could smell the fuel and the seat belt release was crushed between the seats. could not get it off. next thing i see a guy standing right next to me, I say you got a knife? he pulls out switch blade and hes hesitating . I say what are you waiting for cut it! with one swipe he cuts it . I hop out the window like I'm OK! then It hit me I fell to my knees the broken Rib was pushing on my lung and i was having a hard time breathing. spent a week at USC on morphine. I am very lucky that was the only injury I sustained! No blood anywhere I don't know how I avoided getting cut by all the broken glass anyway that's actually old news. Its just that I'm still suffering the ramifications of that day. my car was loaded with all my Carpentry tools. I lost my tools, my car, my phone, my glasses, my wallet and I D, Three witness said I took a red light only had no coverage. I did go to the scrap yard after getting out of the Hospital to see what I could recover . nothing was in one piece they cleaned up the scene of the accident and used my car as the trash bin. they must have used shovels and all the leaf grass and dirt mixed with fuel from the scene was in my car. 12" deep I couldn't help Laughing but it hurt so bad to laugh. I'm Okay Though GroG all Those things have been replaced. I told you the story because that's what motivated me to start this project and many of the parts on my robot came from my broken tools I was able to drag out of the yard.
So I'm not going to give up on it! I just had so many thing going on. I will be working on it soon. just let me catch up.
Thanks for asking
I'm not the superstitious type but I like the sound of "creation from the wreckage of your Past."
any one who has read this far in the thread now knows how the story of my latest "creation"Humanoid Arm Bartolobot Begins! this is how the Story accualy Begins for the 7th encarnation of my robot arms. and it began with broken ribs! broken Tools! and broken dreams!........More to come
update
So heres where my project is at (pic)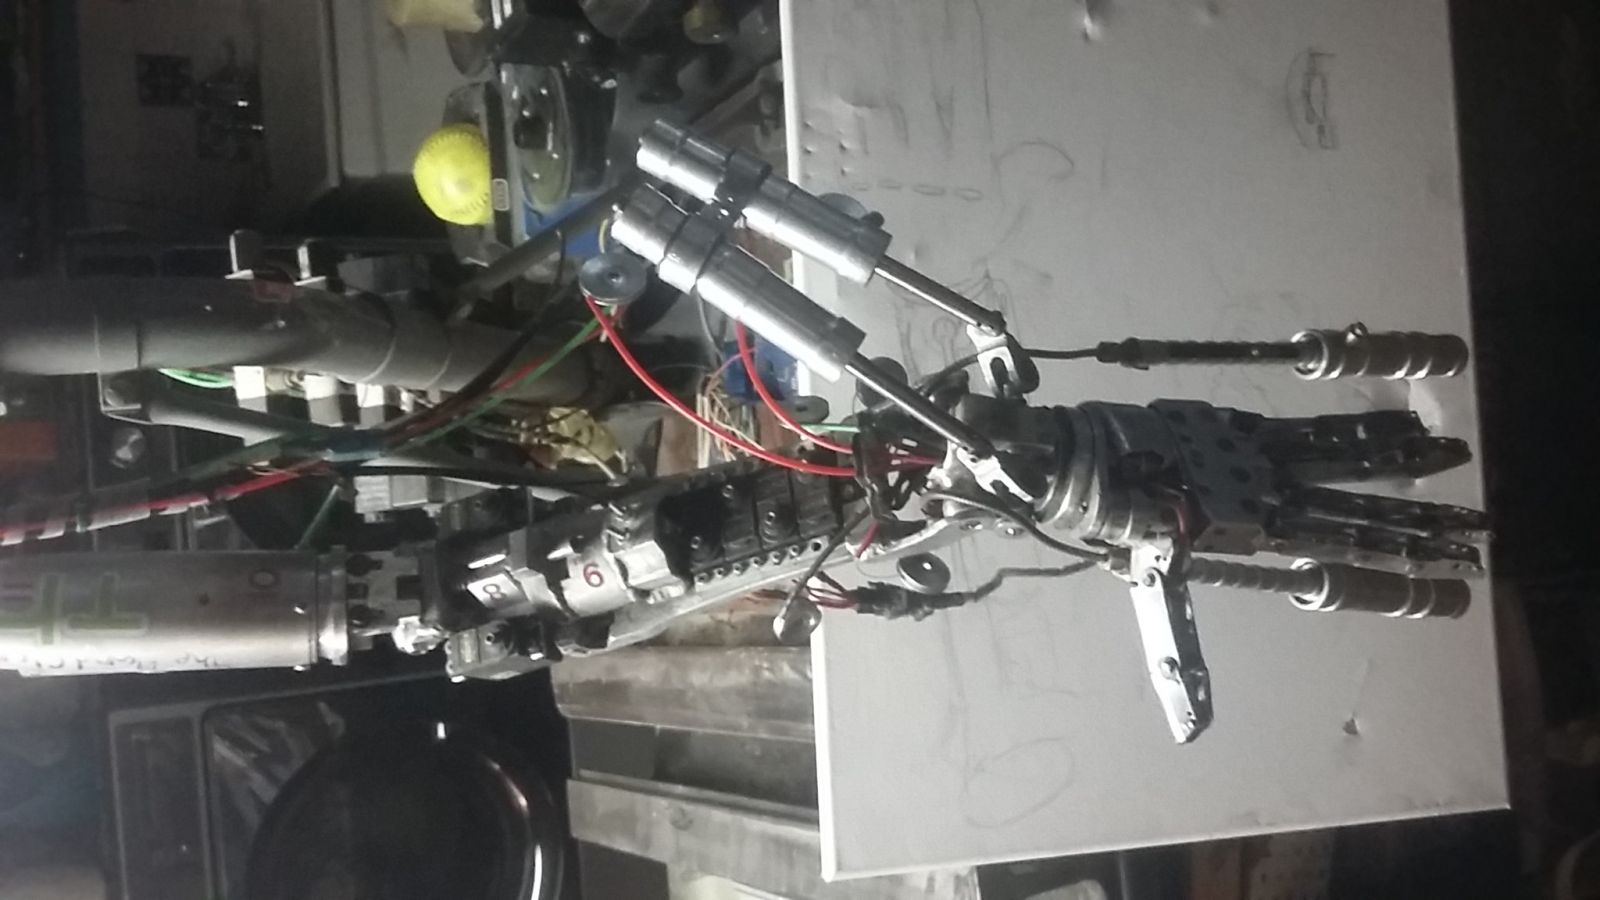 a little dusty and partially taken apart the electronics will have to be checked and rewired due to using a bread board and push pins some of the wires came off and my air supply lines are all disconected . Pushed aside for a while not due to an auto accident said earlier that really did happen but a bit more than 2 yrs ago and why this project came to be. But because of work and other projects like a 6ft upright BBQ smoker all welded 1/8" plate steel check it out here https://www.instructables.com/id/The-Dragon-Unifire-Smoker/ among other things I'm also working on upgrading my workshop with additions like a Lathe some 3D printers, and I made a 2x72 Tilt belt Grinder that can go from vertical to horizontal. and always thinking of my robot these tools will help me make some upgrades to it. As in the cylinders they were all made on a wood working Lathe. Now I have a proper metal Lathe. more to the point my Robot Arm needs some work to get back in working order but I have begun to dust it off find the cabels and air hoses and all the little parts. be BAck soon!
Ahoy Bartolobot !
Good to see you back ! It's been a while. From your post its hard to tell if you have new updates or not.
How has it been going ?